Creating a role
In Ansible, roles are organized under the roles directory. You create a folder under roles, and whatever you name the folder will become the name of the role. Then within that folder, you create a minimum of one folder called tasks, which should contain a main.yml file defining the primary tasks that the role will perform:
- Let’s break things up and create a role for our users by creating a users folder in the roles directory.
Your directory structure should look a bit like this:
├── playbook.yml
└── roles
└── users
├── files
│ └── wallpaper.jpg
└── tasks
└── main.yml
2. Now, create a main.yml file in the tasks directory, and let’s port our user-related tasks over into that file.
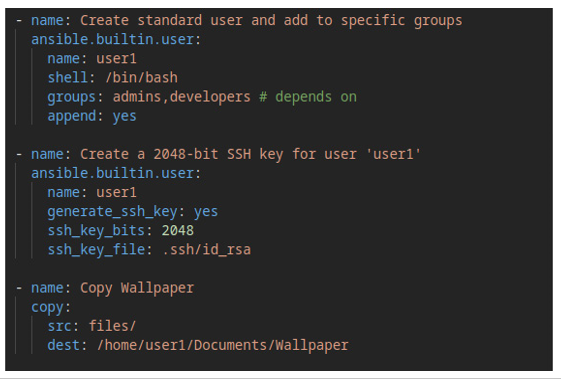
Figure 8.19 – Ansible role for provisioning users
- Now we have the beginnings of a role. We can take advantage of other features to facilitate pre-configuration operations. Here are two features that I tend to use most often – files and meta:
• First, you’ll notice we are referencing a files directory. That is a special directory that belongs to a role, and contains files related to that role.
• The other is a meta directory that acts as a way to declare dependencies. For example, since the users role depends on certain groups to exist, it may be a good idea to make this role dependent on the groups role first. To do this, we can simply create a role for groups and then call this role from the meta directory. - The groups role may look like the following. Notice the directory structure, along with the accompanying files – all of which are elements that make up a role. Your directory structure should look like this:
├── playbook.yml
└── roles
└── groups
└── tasks
└── main.yml
5. The actual task should be written in the main.yml file with the following content:
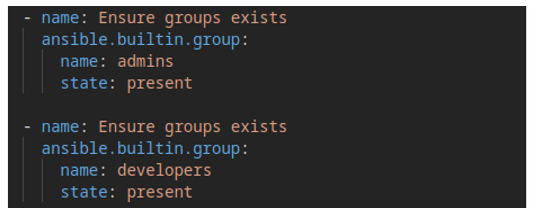
Figure 8.20 – Ansible role for user groups
6. Now, in the meta/main.yml file for the users role, we just need to call the groups role as a dependency:
—
dependencies:
– role: groups
7. Finally, run the playbook with the following command:
$ ansible-playbook playbook.yml
You have successfully created a role within Ansible.
8. Next, repeat this process until you have everything organized into roles. For me, I ended up with the following directory structure:
├── playbook.yml
└── roles
├── base_software
│ └── tasks
│ └── main.yml
├── containers
│ └── tasks
│ └── main.yml
├── get_hostname
│ └── tasks
│ └── main.yml
├── groups
│ └── tasks
│ └── main.yml
├── update_packages
│ ├── meta
│ │ └── main.yml
│ └── tasks
│ └── main.yml
├── uptime
│ └── tasks
│ └── main.yml
└── users
├── files
│ └── wallpaper.jpg
├── meta
│ └── main.yml
└── tasks
└── main.yml