First things first, let’s review the installation and configuration instructions for Oracle Linux Manager – this can be found at https://docs.oracle.com/en/operating-systems/oracle-linux-manager/2.10/install/#Oracle-Linux-Manager. Since we aren’t using an Oracle database, we will divert slightly from the instructions outlined – this means we’ll skip anything related to Oracle databases (for example, we won’t need the Oracle Instant Client and SQL*Plus packages).
To illustrate what we’re going to do, I’ll list all the steps from the guide, applying bold style to the steps we want to keep. The ones that are not bold will be skipped:
- sudo yum install oracle-instantclient18.5-basic-18.5.0.0.0-3.x86_64.rpm oracle-instantclient18.5-sqlplus-18.5.0.0.0-3.x86_64.rpm
- echo “/usr/lib/oracle/18.5/client64/lib” | sudo tee /etc/ld.so.conf.d/oracle-instantclient18.5.conf
- sudo ldconfig
- sudo yum list installed | grep jta
- sudo yum remove jta
- echo «exclude=jta*» >> /etc/yum.conf
- sudo yum-config-manager –disable ol7_addons
- sudo firewall-cmd —permanent –add-port=69/udp
- sudo firewall-cmd —permanent –add-port=80/tcp
- sudo firewall-cmd —permanent –add-port=443/tcp
- sudo firewall-cmd —permanent –add-port=5222/tcp
- sudo firewall-cmd —permanent –add-port=5269/tcp
- sudo systemctl reload firewalld
- sudo yum install oracle-release-el7
- sudo yum install oracle-linux-manager-server-release-el7
- sudo yum-config-manager —enable ol7_optional_latest
- sudo yum install spacewalk-oracle spacecmd spacewalk-utils
- sudo spacewalk-setup –external-oracle
And that’s basically it. The following is for additional changes that we need to make to use Oracle Linux Manager with PostgreSQL:
sudo yum install spacewalk-setup-postgresql spacewalk-postgresql
Finally, we’ll need to provide an answer file since the automation we’re doing in Vagrant cannot be interactive:
sudo spacewalk-setup –non-interactive –answer-file=/tmp/answer-file.txt
Create a file named answer-file.txt and place the following content into the file:
admin-email = root@localhost
ssl-set-cnames = spacewalk
ssl-set-org = Oracle
ssl-set-org-unit = OLM
ssl-set-city = Raleigh
ssl-set-state = NC
ssl-set-country = US
ssl-password = Password1
ssl-set-email = root@localhost
ssl-config-sslvhost = Y
db-backend = postgresql
db-name = spaceschema
db-user = spaceuser
db-password = Password1
db-host = localhost
db-port = 5432
enable-tftp = Y
This summarizes the bulk of the installation and configuration steps. Next, in order to make all of this work so that we can deploy and provision Oracle Linux Manager automatically using Vagrant, we need to make some very simple changes. All we really need to do is paste those steps into a Bash shell script file and tell Vagrant to use a provisioner to run these commands on the box. Also, again, since automation cannot be interactive, we just need to add -y to all the yum commands.
Therefore, to clean things up and prepare them for Vagrant, our Bash script will look something like this:
#!/bin/bash
yum remove jta -y
echo “exclude=jta*” >> /etc/yum.conf
yum-config-manager –disable ol7_addons
yum install oracle-release-el7 -y
yum install oracle-linux-manager-server-release-el7 -y
yum-config-manager –enable ol7_optional_latest -y
yum install spacewalk-schema-2.10.14-1.el7 spacewalk-setup-postgresql spacewalk-postgresql spacecmd spacewalk-utils -y
spacewalk-setup –non-interactive –answer-file=/tmp/answer-file.txt
Note
At some point while authoring this recipe, an update was made to the spacewalk-schema package making it no longer compatible with PostgreSQL. This can be fixed by pinning the spacewalk-schema package to spacewalk-schema-2.10.14-1.el7 as shown in the preceding snippet.
I removed the call to sudo for each step since everything runs as root during the provisioning phase of Vagrant.
Now for the Vagrantfile, add a few lines so that Vagrant can copy the answer-file.txt file to the guest machine, then tell Vagrant to execute the script we just wrote. We’ll also create a private network, which allows host-only access to the machine using a specific IP (this will allow us to easily access Oracle Linux Manager via our web browser):
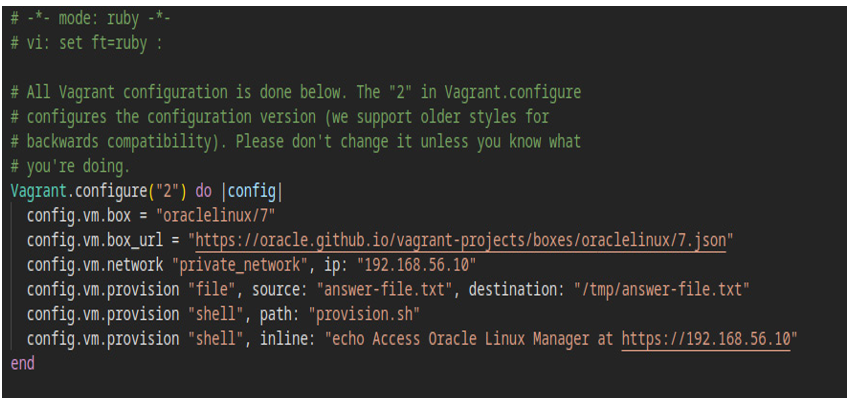
Figure 8.25 – Vagrant file for deploying OLM
Note
On Linux/Unix-based systems, VirtualBox will only allow IP addresses in 192.168.56.0/21 range to be assigned to host-only adapters. This allows for IP addresses starting at 192.168.56.1 and ending at 192.168.63.254.
Now we can review what our directory should look like:
└── oracle-linux-manager
├── answer-file.txt
├── provision.sh
└── Vagrantfile
We’re ready to fire things up:
$ vagrant up
…
…
…
–> default: Running provisioner: shell…
default: Running: inline script
default: Ac
cess Oracle Linux Manager at https://192.168.56.10
You’ll watch as the provisioning script installs and configures Oracle Linux Manager, and within a matter of minutes, you’ll be able to point your browser to the IP address defined for the virtual machine to access Oracle Linux Manager. The best part about this is everything is defined as code. Everything we created in this recipe amounts to just 6 KB in size! Vagrant does an amazing job at solving the classic “it works on my machine” problem. You can take these 6 KB of code and deploy your work on any machine (Mac, Windows, Linux, etc.) – all you need is Vagrant and Oracle VM VirtualBox.
We could take this automation a few steps further to make it even more useful. For example, we could automate the creation of the first user for Oracle Linux Manager, automatically create the channels, repositories, and activation keys, then create clients for OLM and connect to them automatically. Getting into the details for all that is beyond the scope of this recipe, but if you’re interested in seeing how this is done, I’ve got the solution published on GitHub – you can find that here: https://github.com/PacktPublishing/Oracle-Linux-Cookbook/tree/main/ch8/vagrant.